So finally this is posted. For some reason this pattern has given me TONS of problems!
This is actually not been fun for me to do,
and I love doing this!
But I prevailed! I am smarter than fabric!
What an accomplishment!
Anyway, this is the tutorial for the dress that won this vote.
Here it the pattern.
Gather all of your pieces. I am making this a top, not a dress, but this can be whatever you want!
That is the joy of sewing your own clothes.
(A tunic would be SO cute!
Maybe with some ruffles at the bottom...
humm
I think I might have my next project!)

Step 1: Sew the sleeves to the front.
The sleeve sides are different. The sides should line up with either the front or the back.
Double check which direction the sleeves are being sew on.

Step 2: Sew the sleeves to the back.

Now comes the hardest part of the whole thing!!
Step 3: The key hole. Place the template on the seam.

Cut around the template, if you have a serger, serge the edge.
Then hem.
If you don't have a serger, just hem the neck, including the key hole.
Start where the key hole was cut out of the sleeve.
Then continue around. I found that to be the easiest!


I know it is not very pretty, because I had "help."


The black lines are where to put the button.
(I did this after all the hemming was done)

Step 4: Sew up the sides.
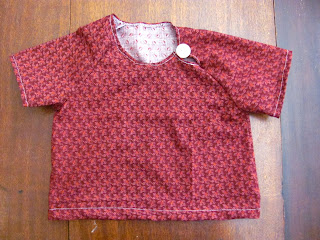

Step 5: Add your button. I used a button and elastic closure.
I know I used white thread on this red fabric. But because I had "help" I didn't feel like changing the thread.


I didn't realize how dirty this mirror was until this picture.
She is wearing it over other clothes.

But I still think it is pretty cute.
If are planning on making this a dress,
add the belt loops on the sides where the natural waist is located.
Then thread through your belt. Simple as that!
4 comments:
Thanks for linking up to my Everything Nice Baby Girl Link Party!
madincrafts.blogspot.com
That is such a cute shirt!! I've been wanting to make a keyhole neck on a shirt for my daughter. Now I don't have to figure out how to do it!
I linked to your tutorial over at Craft Gossip Sewing:
http://sewing.craftgossip.com/free-pattern-peek-a-boo-shirt-or-dress-for-little-girls/2010/08/24/
--Anne
cute! Great tutorial!
Hi there, I just linked this awesome tute on my blog: http://whimsycoutureboutique.blogspot.com/2011/08/whimsy-finds-free-peek-boo-shirt.html
Post a Comment