Showing posts with label dollar store. Show all posts

February 10, 2012

Photography Hack

I think many of us are aspiring photographers. Just admit it. 
But let's be honest, 
who can really afford a backdrop?
Seriously? 
They are like $100-$300. 
That's just for the backdrop, don't forget about the flooring, 
and the baseboards, and the lights, blah blah blah.....
The list is long....
Well, to make this long story short, I was at the dollar store the other day, 
and well I found these...
contact paper
Contact paper! Apparently, people use this for lining in cabinets and such,
but the clear stuff, I use for laminating. 
There is so many uses for contact paper!
I have seen wood print contact paper at WalMart too, but $8...
GA! I'm so cheap. 
Anyway, I saw this and my brain got turning. 
I remembered I had this roll of paper.... I know!
(Oh you guys are going to love me!!)
paper
I'm going to make some backdrops. 
Oh yeah!
green contact 1
I stared with the edges, and lined it up as best as I could. 
If you just leave the contact paper on the roll and pull the flimsy white stuff off slowly, 
you shouldn't get any bubbles. 
Just go slow and a few inches at a time. 
green contacct 2
Then I went down the center.
All done! 

Here's the rundown:
12 rolls of contact paper
White Paper on hand
which made 2 backdrops
and 2 flooring drops
Total: $12

I just saved myself over $500!
I call that a win.

Here are the backdrops in action!
Please excuse what my daughter is wearing and her hair, oh, and the rubber band.
I let her get dressed by herself, and I was too lazy to tame that wild mane!


k with black and brown background
See how awesome! I don't have any baseboards, but I just couldn't wait to show you!
Looks pretty good right?
If you look closely you can see where the pattern doesn't line up, but come on $3??
k with black and brown flooring
There is a downside to them, 
but I think it would be the same with professional backdrops, 
they need to be completely flat. 
As you can see by my daughters feet, 
that is where the tile changes to carpet, so there's a tiny bump. 
I don't find this a huge deal for what I paid for them.
Also, the light green backdrop, 
if the background is in focus, 
you can see the lines, where is over laps. 
Again, I don't find this a big deal, I'll just blur the backgrounds!
Easy!

March 09, 2011

I forgot to show you

Yesterday, I did a dollar store shirt refashion, 
and I forgot to show you what it looked like on!!
What do you think?
Stop looking at my massive hair, 
and look at the shirt. 

March 08, 2011

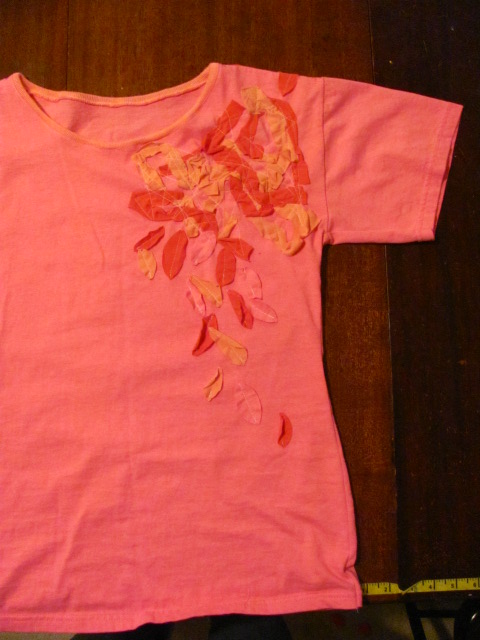
Dollar Store Shirt Refashion

Here is your basic, 
run of the mill, 
nothing special, 
pink dollar store shirt. 
Already turned inside out waiting to be changed. 
With a change of collar, 
and shape,
this shirt looks like I spent more than a dollar, 
that's for sure!
With other old shirts and some time. 
This is what I got. 
I thought it would be fun to continue the design over the shoulder, 
and what do you know!
I like it!

More shirt refashions to come!

February 21, 2011

Sneak Peek

Did you see it?
I mentioned in the last post a sneak peek.
Well I found this shirt a few days ago and,
I love it!
But the huge $80 price tag!!!
WHAT?!
See how simple!?
And it just begs to be "DIY-ed
A dollar store shirt +
Freezer paper sencil +
refashioned lace =
TA-DA!
I know it's not the best picture, 
but I just saved $79!!
That's right!

August 27, 2010

Kitchen Conversions

I found this conversions chart a few days ago, from another blog, 
and I feel so bad, but I can not for the life of me, 
find where I got this!! 
It is very frustrating! 
So if you have seen this before, or if this is yours let me know, so I can give you credit!

Anyway, I loved it. 

I want this in my kitchen, so I made one myself. 
I don't have the luxury of having a silhouette, or a cricut
or else I would have done something completely different. 
So I work with what I have. 
I embroidered this little baby in a few hours.

I put a backing on it because, I think it is easier to embroider like that.
And the fabric was black! I can't see my blue fabric marker on that!
Any who.
 I am being lazy today, so this is as much of the backing that I cleaned off.

I painted a dollar store 8"x10" frame, white. 
Just a few coats, to keep in nice and white.

I grabbed good ol' Aleene.

And sprayed some quilting batting onto the back of the embroidered fabric.

See my sophisticated way of measuring. 
I know, try not to be too awed by my fantastic ability to measure.
I cut around the frame. 
Make sure the words, or whatever you are putting in this frame is strait. 
Then hot glue down the corners.
Don't put too much hot glue, because you don't want to see the glue from the front!
Glue down the sides. 
And trim the excess fabric off. 

Because I am working with what I have, I didn't have anymore quilting batting, 
so I used fiberfill to stuff this frame. 
I just pulled it apart, and flattened it out as best I could. 
I wasn't worried.
(maybe a little)
If the back seems to bulge too much,
either take some fiberfill out, or hot glue it down.
Ah, hot glue, the all purpose tool.
All done!

See it just has a little shape to it.
I like it. 
It has a somewhat retro feel to it. 
But that is why it is SO fun!
Related Posts Plugin for WordPress, Blogger...